How to enroll with ID.me for ID Proofing & MFA?

1. How to Enroll with ID.me for ID Proofing and MFA?

Step 1: Provider needs to click on the link https://www.h2hdigitalrx.com/app/ to access the Digital Rx login page.

Step 2: Once the login is completed, the provider will navigate to the ID proofing landing page which has a clickable button “Verify with ID.me” that will direct to the ID.me Sign In page.

The integrated providers will also navigate to the same ID proofing landing page, which has a clickable button “Verify with ID.me”.

Prerequisites

    1. Personal email address and mobile phone number.
    2. Social Security Number (SSN), National Provider Identification number (NPI), and Drug Enforcement Administration certification number (DEA number).
    3. State driver’s license, other State issued photo ID, Passport, or Passport card for ID proofing.
    4. An Android or IOS (Apple) smartphone with internet & camera to download mobile app and scan QR code.
    5. ID.me requires your consent to share your identity information with H2H Digital Rx to get the access to your H2H Digital Rx account you must click on “Allow” at the consent page.
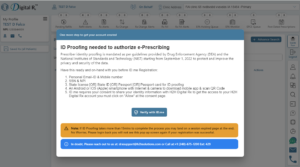
    6. Each new prescriber must complete ID verification before they can be registered for Sure Scripts as of September 2022.


2. Create an ID.me account
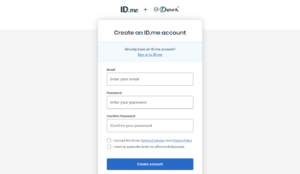
  • To create an ID.me account enter an Email address and password.
  • Click on the Create account button.
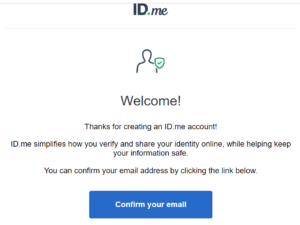
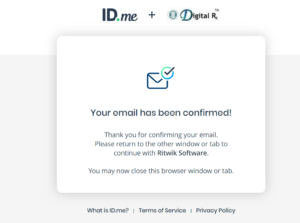
  • A Confirmation email will be sent to the provided email address.
  • The user must click on the confirmation link.


  • 3. Options to Set-Up Multi-Factor Authentication
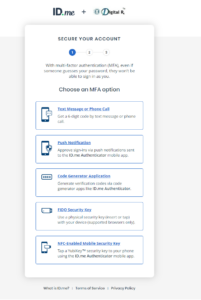
  • “SECURE YOUR ACCOUNT” is the screen that appears after the user clicks the confirmation link.
  • This screen will display multiple options to set-up multi-factor authentication.
  • When the user clicks on one of the Multi-factor Authentication options, they need to download an authentication app.


  • 3.1. If the User Selects Push Notification as a MFA option


    When the user clicks on the Push Notification button it will display two options to download the authenticator app.
    [A] Text Message Method & [B] Email Method
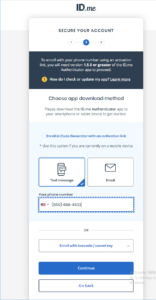
    Note: To go with Push Notification, the user must download the ID.me Authenticator App over a mobile/iPad device.

    3.1.1. Text Message Method:
    If the user selects the Text Message method: The user must enter the mobile number and receive a text message that includes a link to the App Store.
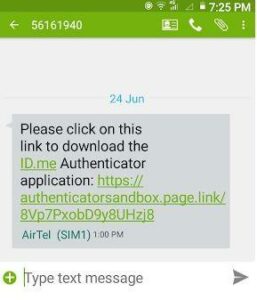
    3.1.2. Email Method:

  • If the user selects Email method: The user must open the email on their phone to access the App Store.
  • The user can download the ID.me Authenticator app from the App Store/Google Play.
  • After downloading the ID.me authenticator app, an alert will pop-up requesting that the user will allow notifications.
  • Select “Allow” to receive notifications.
  • Click on the “Registration Request” notification.
  • Select “Yes” on the Registration Request screen to complete registration.
  • When the user confirms the enrollment and receives the “Registration Success” prompt, the 2-factor enrollment process will be completed.
  • The user can close the application.


  • 3.2. If the User Selects Code Generator as a MFA option

      Click the “Code Generator” button.
      The user will be presented with a screen that will give instructions and a QR code to scan
      To scan the QR Code from the web screen, the user needs to search for and download the “ID.me Authenticator” application from his phone.
      And then the user can open the application.
      Go to the ID.me authenticator app home screen on your mobile device.
      The user can add his account for Code Generator by selecting the green “+” sign in the top right-hand corner of the screen.
      The “Add Account” screen displays.
      Click the Scan QR Code button at the bottom of the screen.
      A QR scanning box appears.
      Position your phone so the QR code on the laptop screen is in the box.
      When the app automatically captures the QR code, it advances to the next screen.
      Once scanned, apps will generate a six-digit code to be entered on the next web screen.
      Enter the six-digit code in the field provided and click “Continue”.
      If the code matches what ID.me is expecting, the user will see a screen confirming that they have completed the two-factor authentication enrollment process.
      This confirmation screen will also have a Recovery Code, which can be used in the event when the user loses access to a two-factor authentication device.
      Please save the recovery code in a secure location for possible future use.
      After saving the recovery code (for Code Generator method), the next screens are related to the identity verification process.


    4. Verification Methods

    Th user may choose any of the three verification methods available by clicking the appropriate button:

    4.1. Upload photos of your driver’s license or state ID
    4.2. Upload a photo of your passport
    4.3. Upload photos of your passport card

    4.1. Upload Photos of your License or State ID

  • The user can go with either “Take photo” or with “Choose Image” option to upload photos as per the requirement.
  • Select the “Choose Image” option.
  • Upload photos of the front & back side of the driver’s license or state ID.
  • Once the upload is done, click “Continue”.
  • Enter the personal phone number.
  • SMS text message will be sent to the mobile with a confirmation link.
  • Click it to confirm in your phone.
  • Click “Continue” to confirm your identity.
  • Enter the Social Security Number.
  • Click “Continue” to confirm the identity.
  • Click “Continue” to verify all the information that you have provided.
  • Click the link “Verify phone” to confirm phone number.


  • 4.1.1. Upload Video Selfie Through Desktop/Laptop Webcam

  • Click “Take a selfie with my webcam” to access video selfie through laptop/desktop.
  • Click on the “Start” button to access video from the device (laptop/desktop).
  • Click “Scan my face”.
  • Scan the user face through a webcam.
  • If the selfie video is not captured properly error will occur.
  • Click “Try again”.
  • Click “Scan my face” again.
  • If the selfie video is captured properly, it will proceed to the next window to verify identity.
  • Note:

  • Make sure the user is in a well-lit area.
  • Remove anything that covers your face (like glasses, hats).
  • Avoid a light source behind you.
  • Hold the phone straight in front of your face.


  • 4.1.2 Upload Video Selfie Through Mobile

  • Click “Take video selfie” to access video selfie through mobile.
  • Click “Enable camera access” to access the camera.
  • Scan your face through a mobile camera.
  • Click “Continue” to submit the image.
  • Images will be submitted.
  • Click “Continue” to return H2HDigital Rx.
  • 4.2 Upload a Photo of your Passport

  • Choose how to submit photos and follow the instructions provided over the screen to verify identity.
  • You can either take a picture with the mobile device or can upload a picture from a device.
  • Upload a photo of your passport.
  • Click on the Look good? button.
  • Enter home address in the provided fields.
  • Click on the Continue button.
  • Enter a phone number that matches your credit profile.
  • Enter your Social Security Number.
  • Click on the “Continue” button.
  • Confirm your details and click on the Continue button.
  • 4.3 Upload Photos of your Passport Card

  • Choose how to submit photos, and follow the instructions provided over the screen to verify identity.
  • You can either take a picture with the mobile device or can upload a picture from a device.
  • Upload photos of the front & back of your passport card.
  • Click on “Looks good?” button.
  • Enter home address in the provided fields.
  • Click “Continue”.
  • Enter a phone number that matches your credit profile.
  • Enter your Social Security Number.
  • Click “Continue”.
  • Confirm the details.
  • Click “Continue.”


  • 5. Verify Medical Provider Credentials

  • To verify as a medical provider, provide your NPI credentials.
  • Click on the Begin button.
  • Enter the NPI number.
  • Click on the Continue button.
  • Select provider type as per your requirement.
  • Click on the Continue button to verify.
  • Click on the Continue button to verify.
  • The provider must click on the Allow button to share the identity information with H2H Digital Rx to get H2H Digital Rx account access.
  • Upon clicking the Allow button, it will display a message stating that “You’ve successfully completed your ID verification and two factor authentication with ID.me for your eRx capability”.
  • Once ID verification is successfully completed, the provider must wait at least
    15 minutes to generate the SPI (Surescript Provider ID) number.
  • Unless the
  • SPI number
  • is generated, the provider is not authorized to make any prescriptions.

  • If the provider prescribes without generating an SPI number, they will receive a message stating that “SPI Number not generated for this User. Please wait for some time or connect with DRx support for support”.
  • Was this article helpful?

    1Total

    1 Yes